CyberArk Enterprise Password Vault – XML External Entity (XXE) Injection

-----------Product description
The CyberArk Enterprise Password Vault is a privileged access security solution to store, monitor and rotate credentials. The main objective of the solution is protecting the privileged accounts that are used to administrate the systems of the organisations.

-----------Vulnerability description
This vulnerability allows remote attackers to disclose sensitive information or potentially bypass the authentication system.

-----------Vulnerability Details
# Exploit Title: XML External Entity (XXE) Injection in SAML authentication
# Affected Component: Password Vault Web Access (PVWA)
# Affected Version: <=10.7
# Vendor: CyberArk
# Vendor Homepage: https://www.cyberark.com
# Date: 18/12/2018
# CVSS Base Score: 7.5 (High)
# CVSS Vector: CVSS:3.0/AV:N/AC:L/PR:N/UI:N/S:U/C:H/I:N/A:N
# Exploit Author: Marcelo Torán (Nixu Corporation)
# CVE: CVE-2019-7442
# CVE URL: http://cve.mitre.org/cgi-bin/cvename.cgi?name=CVE-2019-7442

-----------Technical Description
It has been found that the XML parser of the SAML authentication system of the Password Vault Web Access (PVWA) is vulnerable to XML External Entity (XXE) attacks via a crafted DTD. No user interaction or privileges are required as the vulnerability is triggered in pre-authentication.
The vulnerable component is: https://example.com/PasswordVault/auth/saml
The vulnerable argument: SAMLResponse

-----------Timeline
18/12/2018 – Vulnerability discovered
10/01/2019 – Vendor notified
23/01/2019 – Vulnerability accepted
05/02/2019 – CVE number requested
05/02/2019 – CVE number assigned
19/02/2019 – Vendor released a patch
19/02/2019 – Advisory released

-----------Proof of Concept (PoC)

Trying to increase the severity of subdomain takeovers

In this case we are going to work with a subdomain takeover in Zendesk as it’s a very common vulnerability in Bug Bounties and it could seem less dangerous compared to services likes S3, Heroku, etc.

First of all, as you might know it’s possible to inject JS code in the theme of the Zendesk Help Center. This will automatically trigger for example XSS on the main URL which is very interesting but also introduces other possible attack vectors.

The main objective of our research is to be able to send and receive mails from the vulnerable subdomain (e.g. [email protected]) with as much security validations (DKIM, DMARC, SPF) as possible to try to bypass the SPAM filters.

We will use GSuite, the Google service for business email which fits very well with our requirements, as it’s used in most of the organizations. Also their process of validation of the domain is compatible with our attack.

In GSuite we have three different ways to validate a domain:

  • TXT record in the DNS.
  • Upload an .html file in the / path.
  • Include a meta-tag in the head of the main page.

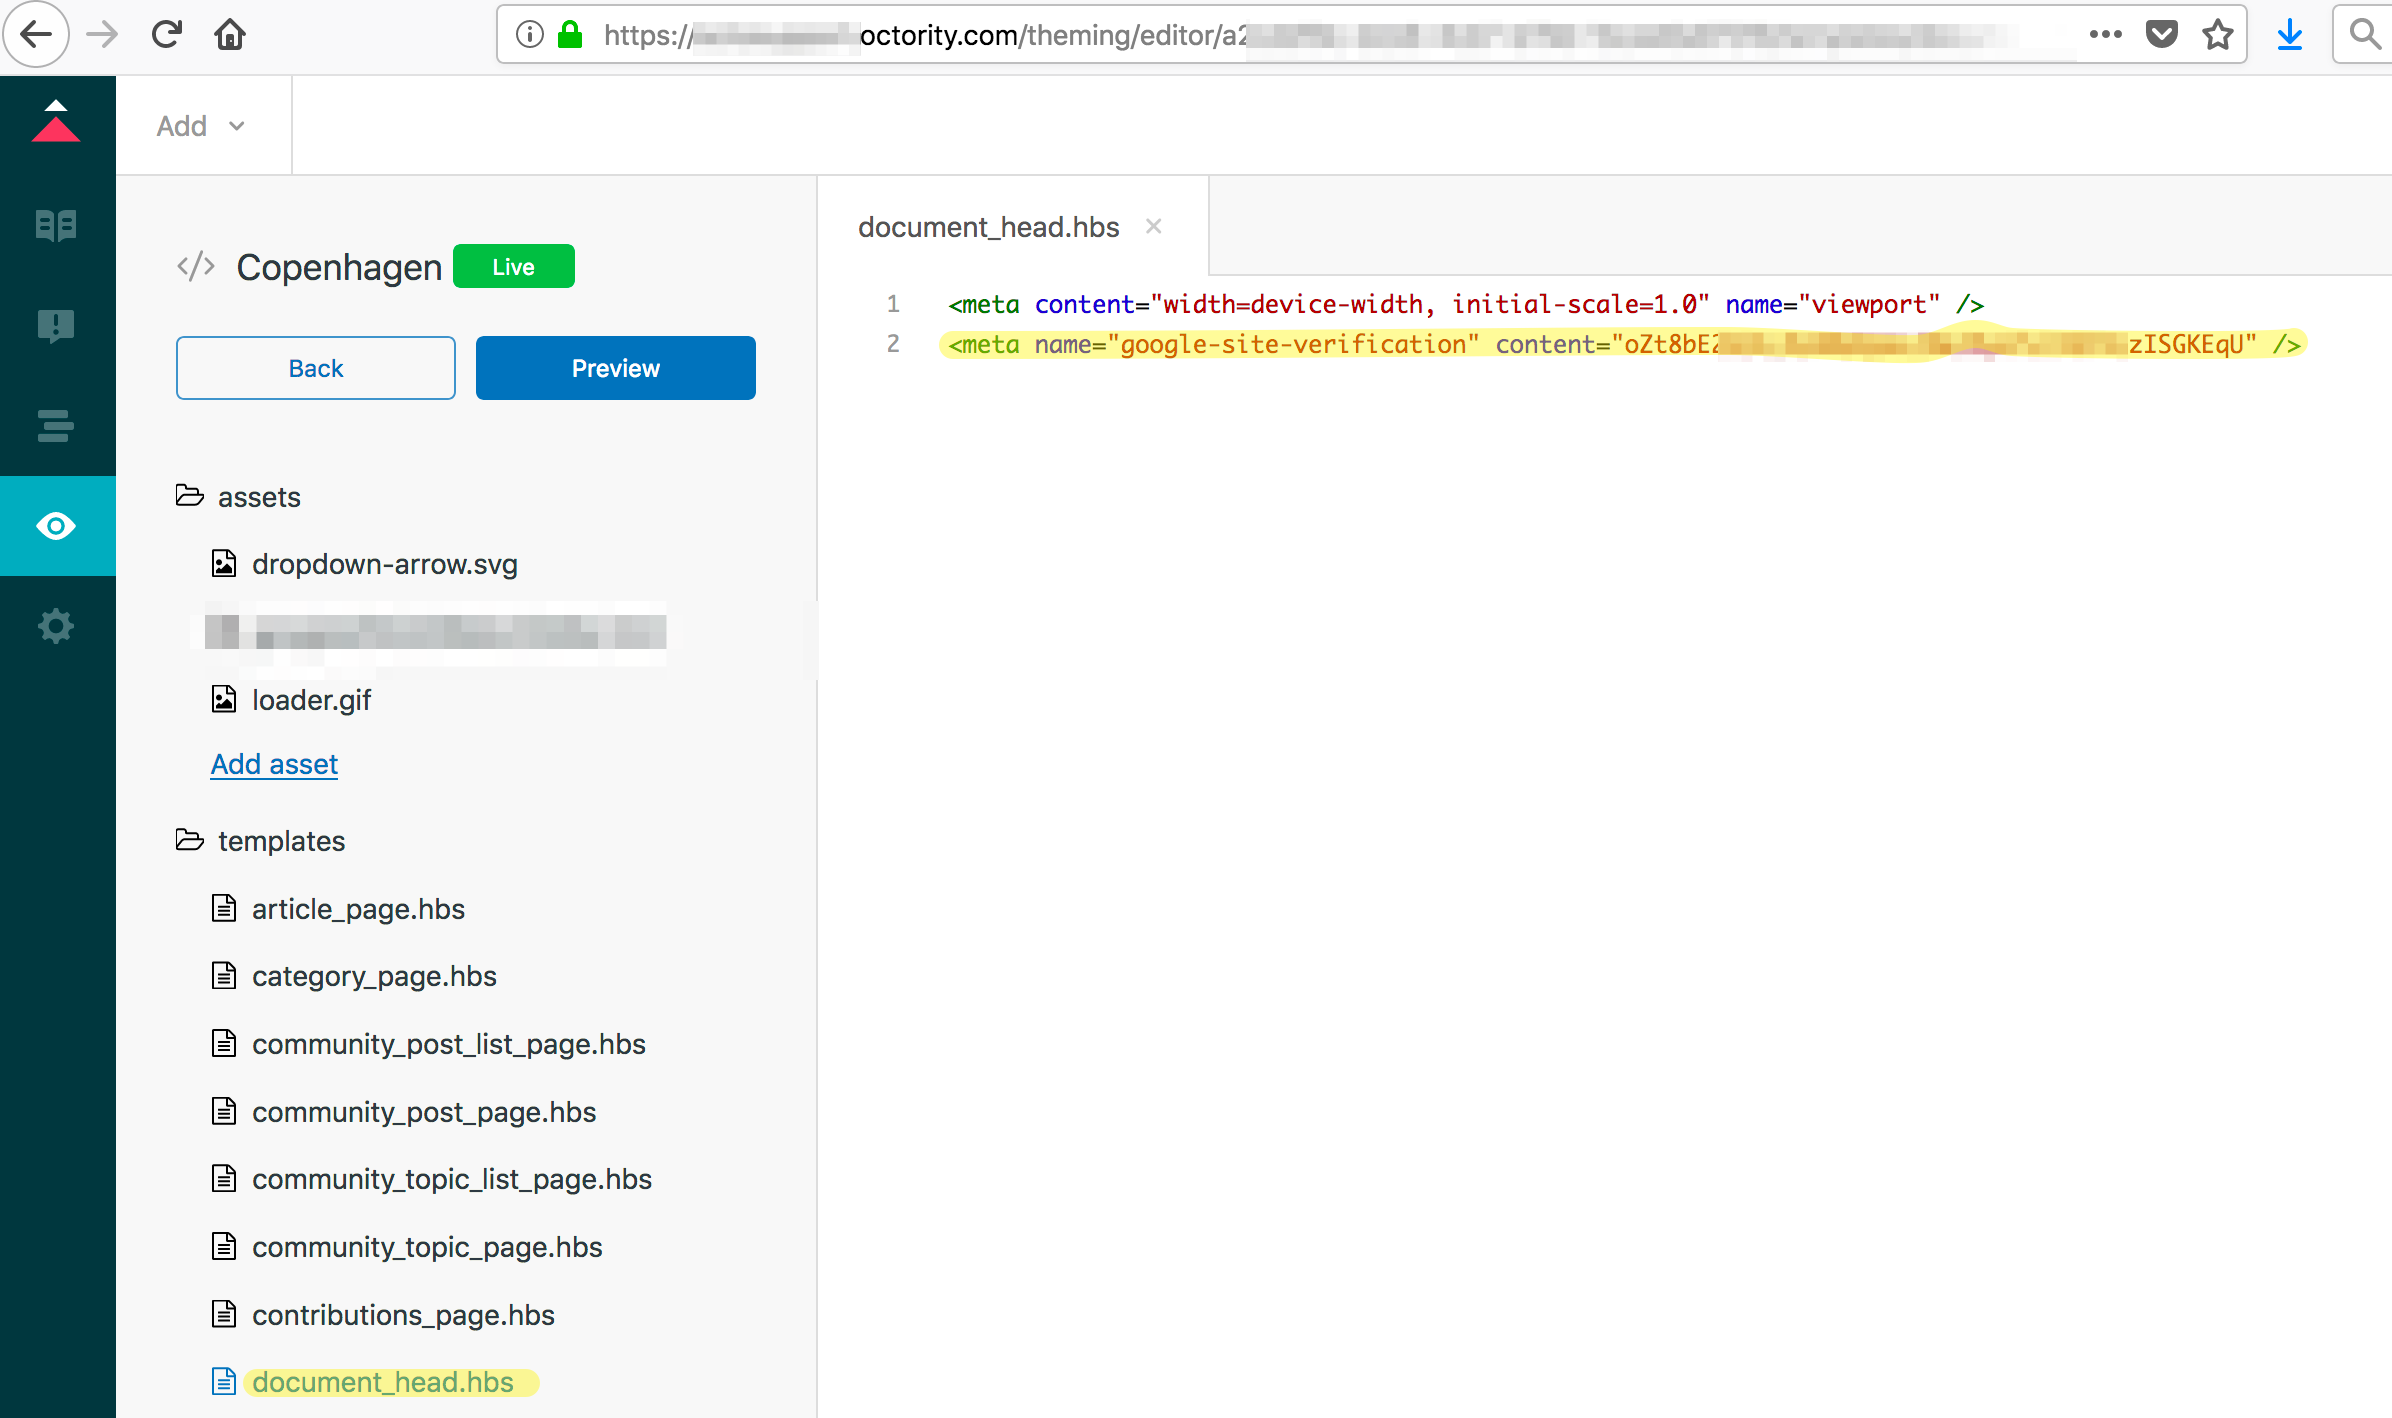
In our case we will include meta-tag generated by GSuite in the head of the main page which in the case of Zendesk it’s possible to add it in the Help Center (Customize Design –> Templates –> document_head.hbs).

After enabling the Help Center, GSuite will be able to authenticate your subdomain and therefore you’ll be able to log in and start playing.

We have to consider that the severity of the attack will vary regarding to the configuration of the DNS of the organization.

Sending emails:

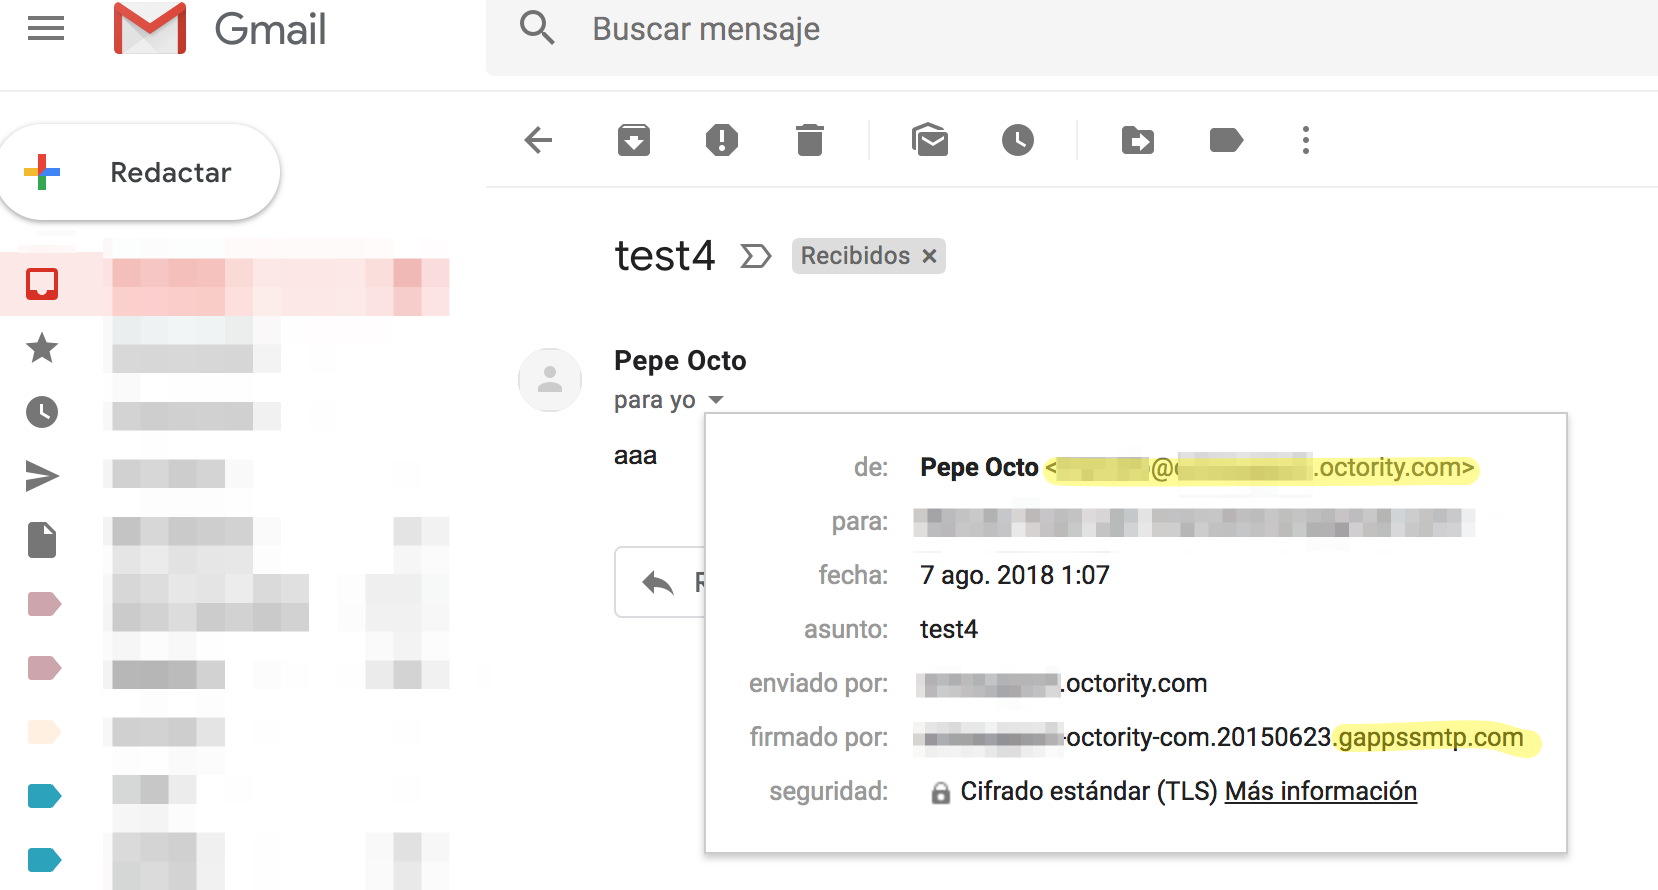
By default if it doesn’t have any DKIM signature, Google adds it automatically and the DKIM will PASS with domain (example.gappssmtp.com).

The DKIM won’t be PASS with the real subdomain as it will be necessary to include the key in the DNS records.

SPF by default will be SOFTFAIL.

If the DNS using a wildcard for the TXT SPF record with including _spf.google.com (GSuit) will be PASS.

If the DNS is using a wildcard with a CNAME to the main domain (redirect all the subdomains to the main page) and the main domain has the TXT SPF record with including _spf.google.com (GSuit) the SPF will be PASS. 

DMARC by default won’t be found and therefore not applied, which is not bad if the SPF is SOFTFAIL.

If the domain aligned of DMARC is configured in a relaxed way, it will be a PASS for subdomains.

The problem about DMARC is that failures could be reported by email and be discovered.

Received email headers:

Received email with the hijacked subdomain:


Receiving emails:

By default it won’t be able to receive the Google mail servers are not configured for the subdomain.

If the MX records are configured with a wildcard we will be able to receive emails in our hijacked subdomain.

Another options could be if a wildcard is configured for all the subdomains (CNAME to the main domain) to forward to the main domain where it’s configured the MX server with the Google mail servers.

MX records of Google mail servers:

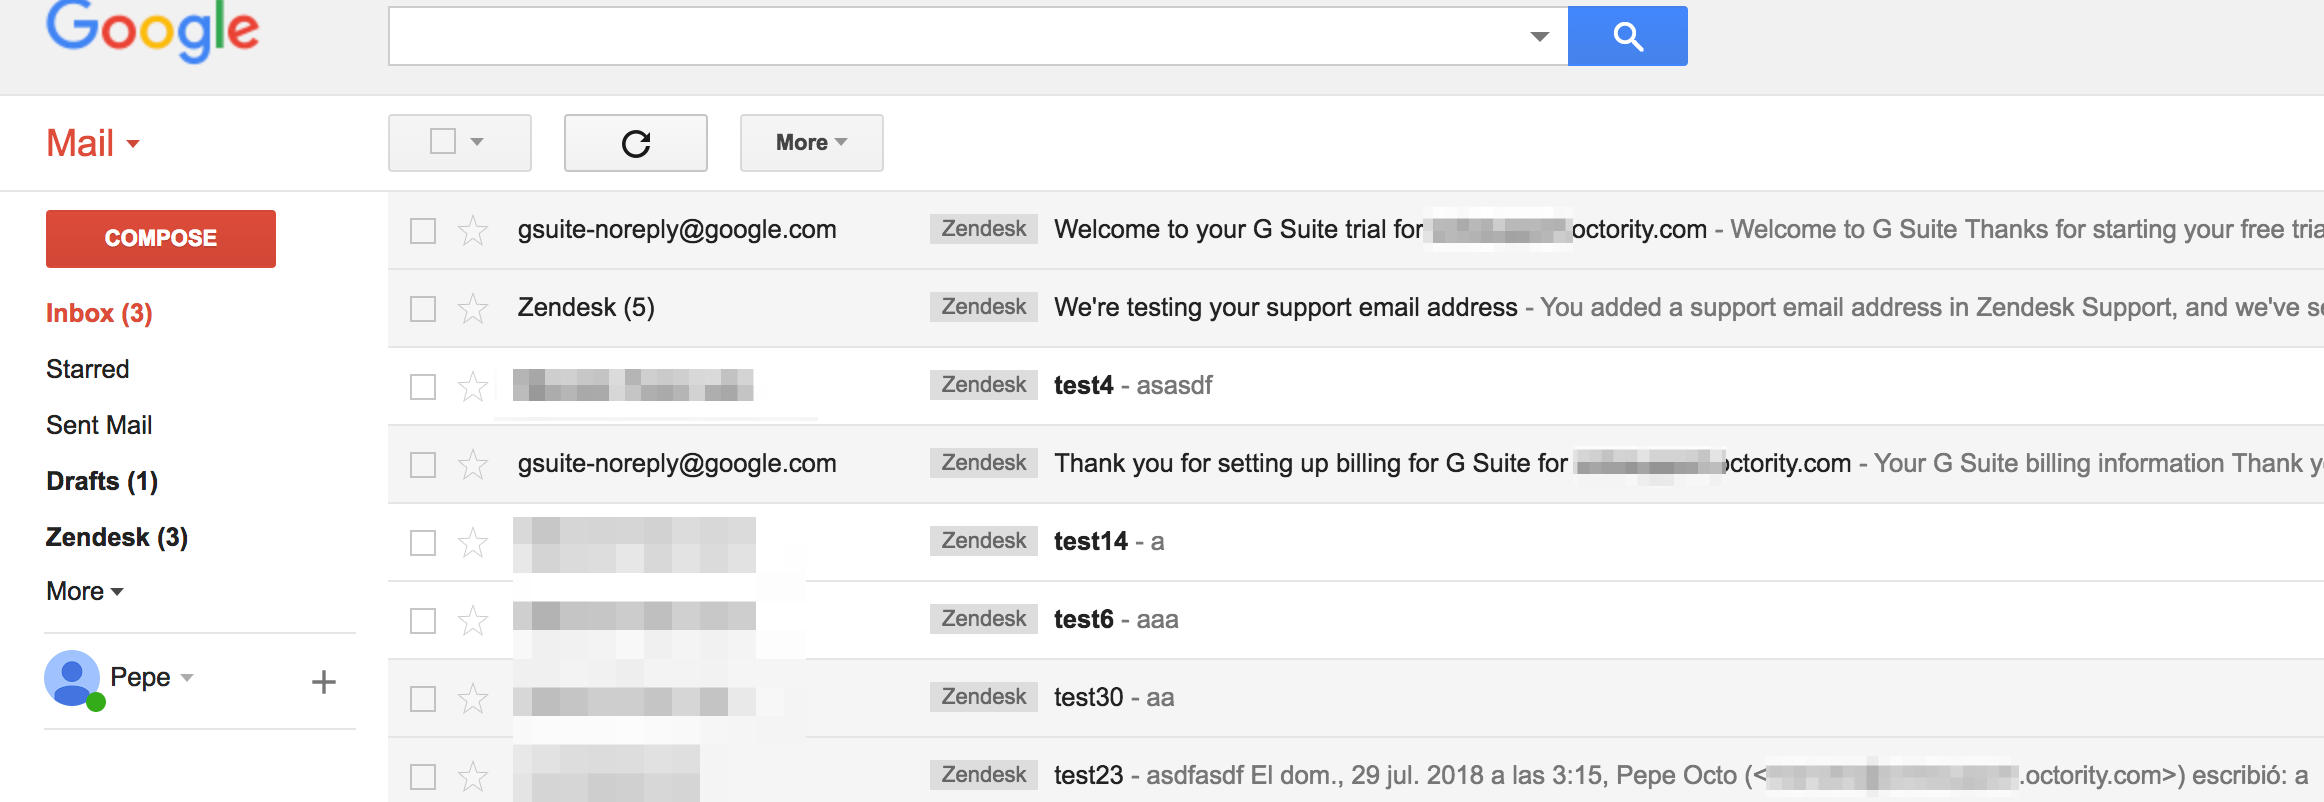
Inbox of the hijacked subdomain:


All this scenarios might seem very rare, but they are more usual than you think, specially when you mix CNAMEs and wildcards.

The best case scenario is a website redirecting (CNAME) all the subdomains to the main domain where GSuite is configured but as you imagine even if they have this wildcard the CNAME of the subdomain takeover will be pointing to the 3rd party service (Zendesk) in this case. So, the strategy will be to register the GSuite business email, report the subdomain takeover and expect that they remove the DNS record of the CNAME. Once this happens, we will maintain the validation of the domain in GSuite and the redirections to the Google mail servers for example will take effect 🙂

I know that it’s nothing new but the objective of this post was to show how the severity of a vulnerability could increase with some DNS configurations that are present in for example some of the Alexa top 100 domains.

From CouchDB admin to remote code execution

CouchDB is a NoSQL database which uses JSON to store the data, and JavaScript as a query language.

We can identify it easily by its ports 5984/6984.

Metasploit has already two modules related to CouchDB. The first one is for bruteforcing the authbasic, and the second one is to dump the databases list once we have the credentials.

  • use auxiliary/scanner/couchdb/couchdb_enum
  • use auxiliary/scanner/couchdb/couchdb_login

Another way to access to the database is the web interface, https://X.X.X.X:6984/_utils/

CouchDB allow us to create new languages to interact with the database as shown in the next picture:


So the trick to execute remote commands is to define new languages, but instead of adding the real route to the main-bash, we just add the command. Obviously we will receive an error, but the command will be executed in the background.


Command execution:


Using the same method is easily possible to crate a Metasploit inverse connection with the server, just uploading the payload and executing the command in the same way.


You can test it in an easy way from a docker image:

docker run -p 6984:6984 -d couchdb

Removing infection modifying Metasploit post modules

The main objective is to remove the persistence of an attack creating a new process. We could do it executing directly a bash command concatenating all in just one line, in order to execute it before it kills itself. But on some cases it will be easier and cleaner (and cause we can 🙂 ) .

  1. 1- How to inject .dll in a process
  2. 2- Modify the module to fit our needs.

We will use the post/windows/manage/reflective_dll_inject module to inject .dll in a process, and as a base of our future modifications.

Here you have the github of the project with all the explanation of the method and a small documentation.

https://github.com/stephenfewer/ReflectiveDLLInjection

Steps I followed:

  • Clone the project
  • Open the rdi.sln project on Visual Studio
  • You will need C++ dependencies + others. (probably you will need the SDK 8.1)
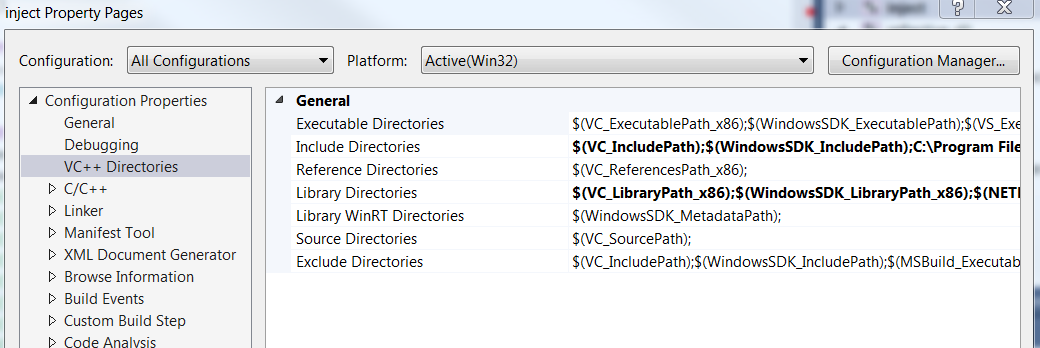
  • You have to define the route to the dependencies. (Proprieties –> VC++ Directories )

  • Add your code to the ReflectiveDll.c

You have the inject.exe to test it locally, as it triggers the .dll file.

Should be noted that we must inject .dll libraries only to the same architecture process (x86/x64/ARM).

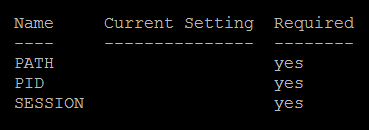
For now, once we build the .dll, we are ready to execute it from Metasploit. We only have to assign the PATH to the .dll file, and the PID of the process to be injected to run the .dll code.

All fine until here, but for our purpose where we have multiple connections and we want to run it in all sessions at once. So we need to modify the module and change the way they reference the process with the PID for the Process Name.

To add new modules the best way is:

cp /opt/metasploit-framework/modules/post/windows/manage/reflective_dll_inject.rb ~/msf4/modules/post/windows/manage/reflective_dll_inject2.rb

Modified:

https://github.com/spamv/Metasploit_dll_injection2/blob/master/reflective_dll_injection2

As you can see, we will only change the INT option for a PROCESS string, and later client.sys.process function get the PID of the process name. We also hardcoded the option parameters, as we pretend to execute them together.

If we need to change any of this options, we can always define a global parameter before the execution.

Now we use the reload_all to reload all the new or modified modules.

To execute it in all the Metasploit sessions:

sessions -C “run post/windows/manage/reflective_dll_inject2”

Manage metasploit listeners with Tmux

In order to have listeners always ready on the C&C and have access easily through SSH we will use Tmux.
Tmux is a powerful alternative to the Screen command, included in multiple Linux distributions like Kali.

Requirements:
– Detachable from the console.
– Always up.
– Logging all the connection.

Create a script called tmux_listener.sh

As you can see here we create a new detached session, then we check if there is another active session, if there is no we create another loggin file.

Finally execute this script to add the script to the Cron job scheduler

If for any reason it dies, the Cron job will trigger another one automatically and another logging file.

Just with we don’t need to worry about it, as it will always be a listener active.


Listing all the Tmux sessions:

Attaching to a session (“windows” is how we named the session before):

Detach from the session:

Adding new skills to the Metasploit Firefox addon

I have been modifying the firefox_xpi_bootstrapped_addon exploit of Metasploit to add some new skills that were necessary to make it more real (for SE) and successful.

From the beginning:
Firefox uses .xpi extensions, in this case uses the restless method, which is able to install the addon and execute it without rebooting the browser.
Here you have more info about the Mozilla Bootstrap addons.

Signatures not required

The bad news:
The last versions of Firefox have the xpinstall.signatures.required flag enabled, and we have to disable it if we want to execute unsigned ones. So by default it’s only possible to execute addons signed by Mozilla (previous review).

The worst news:
In future versions of Firefox it will not be possible to disable the signatures, and only Mozilla signed addons could be executed.

The good news:
Special versions of Firefox ESR will still have the xpinstall flag in the about:config.
Many companies disable it to execute their own plugins. (In this case Mozilla offers the possibility to sign it and store it in a local repository, not the public market)


Here you have more info about the signatures and versions.

This is the MSF exploit that we are going to use:

Once executed it creates a webserver with the plugin

Downloading and unziping the addon

Now the funny part, what we want to do?
– We want to know when the user executes the addon.
– We want to get all his cookies (all the cookies of the browser, doesn’t matter if they have httponly).

Why?
– Because in a phishing attack, it will be very suspicious to execute a plugin that doesn’t do anything. Once the user installs it, we set a cookie that the Javascript code in the client side will read and make some action.
– Because it’s very powerful getting all the cookies in that easy way, and at least we could still have them in the worst case that the RCE exploit fails for any reason.

We are not going to explain all the Metasploit payload, just the code we added.


– In firs place we enumerate all the cookies of the selected domain, and we send them via GET to our external server. It could be also possible to concatenate all of them and send it via POST. (In this case all the user cookies are sent by HTTP so it’s not recommendable at all to use unsecure protocols)
– We create a cookie to be checked by the JavaScript code on client side.
– We also send a request to the server to know that this user executed the plugin.

With this little tricks it’s easy to evade AV as it’s executed on Firefox directly and the stage is encrypted with RC4, it’s easy to fool the users as you can make post execution actions, and easy to get all the cookies as a bonus.

The code works well, but we have not tested it very hard, so we are not responsible for any misuse.

Violent Rapberry Pi Zero: Configuration – Part 1

As it’s possible to configure the USB port of the Raspberry Pi Zero as an Ethernet (also  HID, hard drive) device, we will try to imitate the USB Armory attacks in a cheaper open-source hardware.

Objectives Part 1:  Configure the Pi to enable the USB Ethernet and connect trough SSH.

We will follow the instructions to modify the image:

  1. Flash Raspbian Jessie onto the SD card.
  2. In the boot partition:
    • config.txt  -(Add)–> dtoverlay=dwc2
    • cmdline.txt -(Add after rootwait)–> modules-load=dwc2,g_ether

In this case we will connect through the serial port to the Raspberry Pi to check the IP, as we can not SSH into it using the raspberrypi.local address. (and because we can 😀 )

We will connect with the Bus Pirate tool to the UART port.

Check the color of the UART wires (gray and black):

Bus Pirate Pinout diagram (take care as the color of the wires depends on the way it was soldered)

Check the Pins of the UART protocol (GPIO 14 and 15):

GPIO
Raspberry Pi Zero Pinout diagram


Connection resume:
  • Bus Pirate Red wire      –> RPI Pin #3 (3.3V)
  • Bus Pirate Black wire   –> RPI Pin #8 (GPIO14)
  • Bus Pirate Gray wire     –> RPI Pin #10 (GPIO15)
  • Bus Pirate Brown wire  –> RPI Pin #34 (GND)
Bus Pirate –  Raspberry connection

UART connection through Bus Pirate and SSH through USB0 interface:

Actually the simplest way is to edit the dhcpcd.conf file after flashing the SD:

Add the static IP configuration in the Raspberry Pi (/etc/dhcpcd.conf):
interface usb0
static ip_address=169.254.64.64

Add the static IP configuration in the host:
169.254.64.65
255.255.0.0
169.254.64.64